No extra software needed. Just a few simple clicks and you’re recording!
- Introduction
- What Is Screen Recording?
- Method 1: Xbox Game Bar The Fastest Way to Record on Windows
- How to Turn On Screen Recording Using Xbox Game Bar
- Screen Recorder Windows Shortcut — Super Fast Method!
- Method 2: Snipping Tool — Best for Windows 11 Screen Recording
- Snipping Tool: How to Record Screen on Windows 11
- Method 3: Clipchamp — Record Screen WITH Your Camera
- How to Record Screen on Windows using Clipchamp
- Quick Comparison — Which Method Should You Use?
- How to Turn On Screen Recording If Game Bar Isn’t Working
- How to Record Audio (Voice + System Sound) on Computer
- Where Are My Screen Recordings Saved?
- Free Third Party Screen Recorders for Windows (When Built in Isn’t Enough)
- OBS Studio (Best Free Choice)
- ShareX (Best for Power-Users)
- Loom (Best for Fast Sharing)
- OBS vs Built in Tools – Which One to Choose?
- Typical Problems and Solutions
- Issue: Game Bar not opening with “Windows + G”
- Problem: Game Bar is greyed out/disabled
- Problem: No sound on recording
- Issue: Snipping Tool does not have video camera icon
- Problem: Video file is huge
- How to Record Screen on Windows – Summary
- 1. Quickest way (Windows 10 & 11):
- 2. Best full screen recording software for Windows 11:
- 3. Best for tutorials that include audio:
- 4. Best for complete desktop recording:
- FAQs
- Q: Is there a built-in screen recorder in Windows 10?
- Q: What is the screen recorder shortcut on Windows?
- Q: Can I record the desktop on Windows?
- Q: Where are screen recordings saved on Windows?
- Q: Can I record my screen with audio on Windows?
- Q: Is there a free screen recorder for Windows without a watermark?
- Final Thoughts
Introduction
Have you ever wanted to show someone exactly what’s happening on your computer screen? Maybe you want to make a tutorial, record a gameplay clip, or save an error to show your IT person. Whatever the reason screen recording on Windows is much easier than most people think.
The good news? You don’t need to download anything. Windows 10 and Windows 11 both come with free built in screen recorders. You just need to know where to find them.
In this guide we’ll show you exactly how to record your screen on Windows step by step, in the simplest words possible.
What Is Screen Recording?
Before we start let me quickly explain what screen recording means.
Screen recording is like taking a video of everything that happens on your computer screen. It’s not just a photo (called a screenshot) it’s a full video. You can record yourself clicking, typing, playing a game, or watching something.
Think of it like pointing a camera at your screen and pressing record except the camera is already inside your computer!
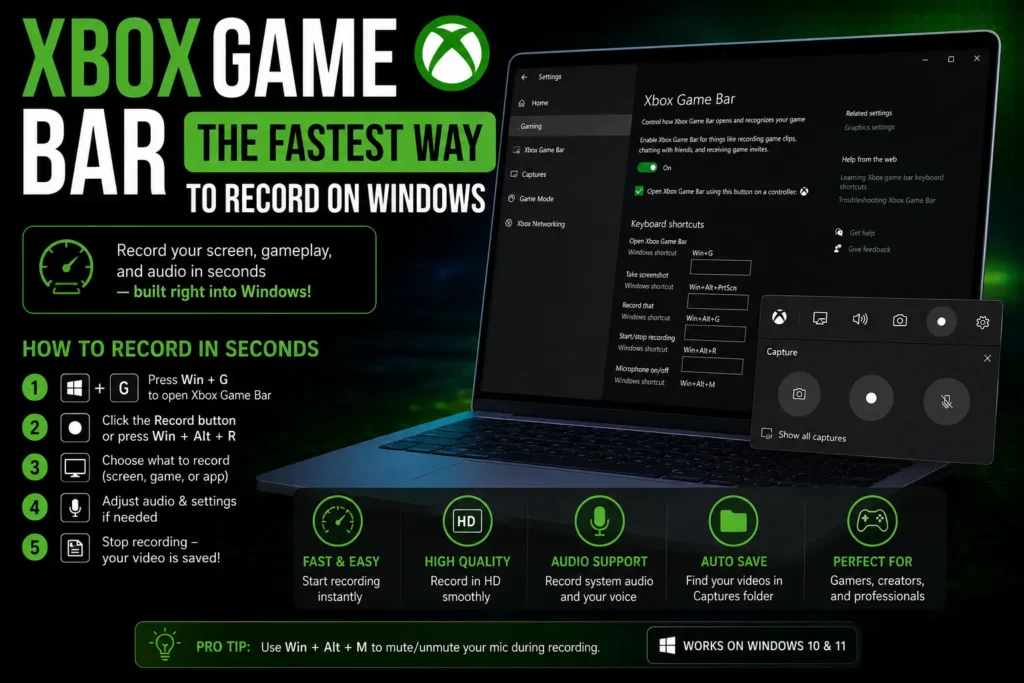
Method 1: Xbox Game Bar The Fastest Way to Record on Windows
The Xbox Game Bar is a tool already built into both Windows 10 and Windows 11. It was made for gamers but anyone can use it. It’s the fastest and easiest way to record your screen on Windows.
How to Turn On Screen Recording Using Xbox Game Bar
Step 1: First, make sure Xbox Game Bar is turned on. Go to:
Settings → Gaming → Xbox Game Bar → Turn it On
Step 2: Open the app or window you want to record. (Important: This tool can record apps, games, and browsers but NOT the desktop or File Explorer.)
Step 3: Press Windows + G on your keyboard. A toolbar will appear on your screen this is the Game Bar.
Step 4: Click the camera icon (called “Capture”) in the toolbar.
Step 5: Click the round red record button (●) to start recording.
Step 6: When you’re done, click the Stop button (square icon) or press Windows + Alt + R again.
Step 7: Your video is saved automatically! Find it at:
This PC → Videos → Captures
The file will be saved as an MP4 video which you can play, share, or upload anywhere.
Screen Recorder Windows Shortcut — Super Fast Method!
Don’t want to open the Game Bar first? No problem! There’s an even faster way.
Press Windows + Alt + R this starts recording immediately without opening the Game Bar!
Press the same shortcut again to stop. That’s it. Your video saves automatically.
Here’s a quick list of all the screen recorder Windows shortcuts you should know:
| Shortcut | What It Does |
| Windows + G | Opens the Xbox Game Bar |
| Windows + Alt + R | Starts / Stops recording instantly |
| Windows + Alt + M | Turns microphone on or off while recording |
| Windows + Alt + G | Records the last 30 seconds (background capture) |
These shortcuts work in both Windows 10 and Windows 11 no need to click anything!
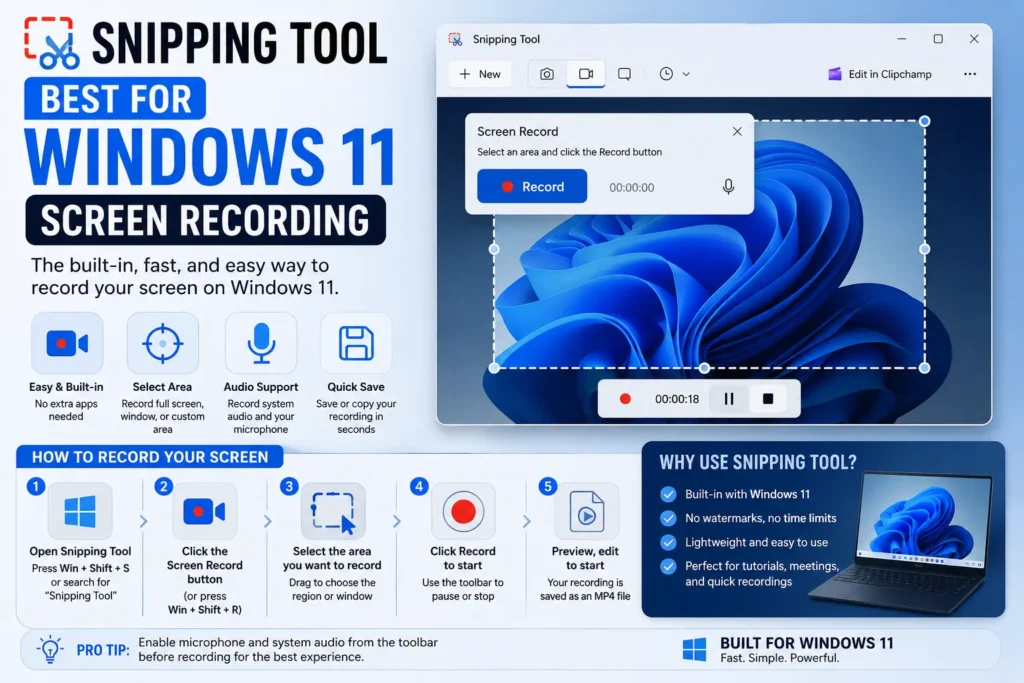
Method 2: Snipping Tool — Best for Windows 11 Screen Recording
If you have Windows 11, there’s another great built-in option: the Snipping Tool. You probably know it for taking screenshots. But now it can also record video of any part of your screen — even the whole desktop!
This is particularly useful if you want to record just a tiny area of the screen and not the complete window.
Snipping Tool: How to Record Screen on Windows 11
Step 1: Click on the Start menu and type “Snipping Tool”. Open it.
Step 2: In the toolbar at the top, click the video camera icon (Record button).
Step 3: Click “New” your screen will dim slightly.
Step 4: Use your mouse to draw a box around the area of screen you want to record. It can be as big or small as you want it to be.
Step 5: Click “Start.” The Snipping Tool will count down from 3 and then begin recording.
Step 6: Do whatever you want to record: click, type, scroll etc.
Step 7: When you are done click “Stop Recording” on the toolbar.
Step 8: A preview window will pop up. Review it then click “Save” (or use Ctrl + S) to save it as an .MP4 video file.
Note: Snipping Tool saves video without audio by default. If you need audio in your recording, use the Xbox Game Bar method instead.
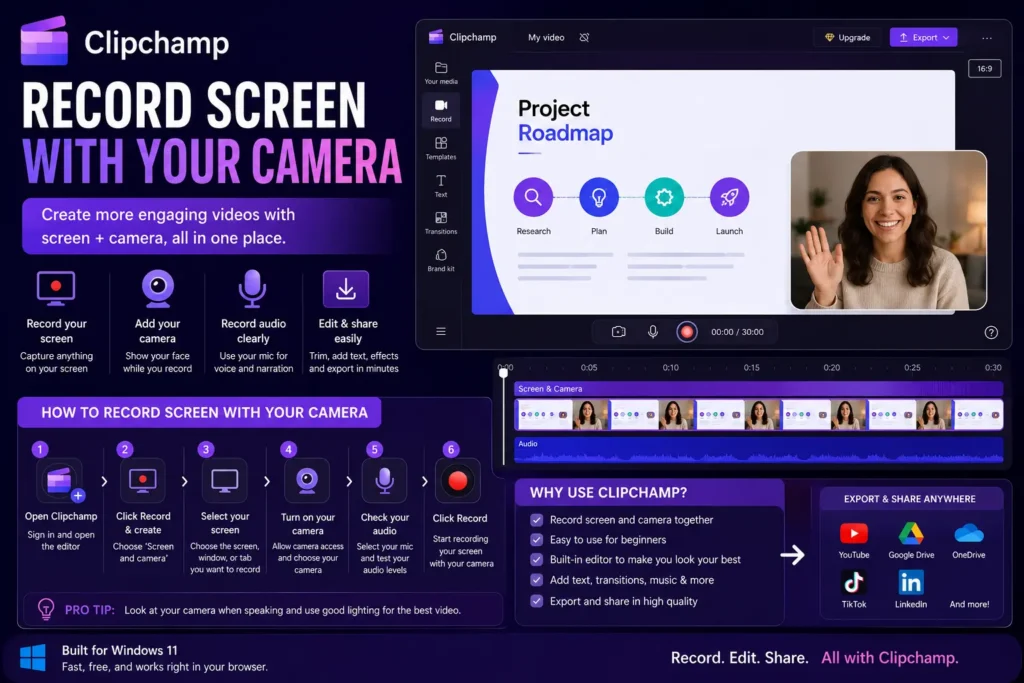
Method 3: Clipchamp — Record Screen WITH Your Camera
Clipchamp is Microsoft’s free video editor software that comes with Windows 11. It has a screen recording feature that’s more advanced it can record your screen and show your face (from your webcam) at the same time.
This is perfect for making tutorial videos where you want people to see both your screen and your face.
How to Record Screen on Windows using Clipchamp
Step 1: Open Clipchamp from the Start menu (or search for it).
Step 2: Click “Record & Create” and then choose “Screen & Camera” or “Screen”
Step 3: Select what to record – your full screen, a single window or a browser tab.
Step 4: Click Share to start.
Step 5: When done click Stop Sharing. Clipchamp will show you a preview. You can then edit the video or export it directly.
Quick Comparison — Which Method Should You Use?
| Method | Works On | Records Desktop? | Records audio? | Best For |
| Xbox Game Bar | Windows 10 & 11 | No | Yes | Games, apps, tutorials |
| Snipping Tool | Windows 11 only | Yes | No (by default) | Partial screen recording |
| Clipchamp | Windows 11 | Yes | Yes | Tutorials with your face |
| OBS Studio | Windows 10 & 11 | Yes | Yes | Advanced / full screen |
How to Turn On Screen Recording If Game Bar Isn’t Working
Sometimes people press Windows + G and nothing happens. Don’t panic! All you have to do is:
Step 1: Open Settings by pressing Windows + I.
Step 2: Click on Gaming.
Step 3: Click “Xbox Game Bar”.
Step 4: Ensure the toggle is switched ON.
Also check:
- You are NOT trying to record the desktop or File Explorer (Game Bar doesn’t support either)
- You are not in Tablet Mode
- Your Windows is up to date
If that still doesn’t work, restart your PC and try again.
How to Record Audio (Voice + System Sound) on Computer
By default Game Bar records system audio (sounds from your PC). You can also record your own voice, though:
Step 1: Press Windows + G to get to the Game Bar.
Step 2: Click the microphone button in the Capture widget to turn on the microphone.
Step 3: Press Windows + Alt + R to start the recording.
Now your video will feature system sound AND your voice.
Tip: You can also press Windows + Alt + M anytime while recording to rapidly toggle your mic on or off.
Where Are My Screen Recordings Saved?
After recording, many people wonder, where did my video go?
For Xbox Game Bar recordings:
This PC → Videos → Captures (or the full path: C:\Users\YourName\Videos\Captures)
For Snipping Tool recordings:
You choose the location when you click Save. It defaults to your Downloads or Videos folder.
For Clipchamp:
You can export it and choose where to save it on your PC.
All recordings are saved as .MP4 files which work on almost every device and can be uploaded to YouTube, WhatsApp or anywhere else.
Free Third Party Screen Recorders for Windows (When Built in Isn’t Enough)
The built in tools are great for basic recording. But if you want something more powerful like full desktop recording or advanced settings here are the best free screen recorders for Windows:
OBS Studio (Best Free Choice)
- Totally free no watermarks
- Records full screen (including desktop and File Explorer)
- Ideal for gamers and streamers
- A little bit complex for beginners but incredibly powerful
- Download from obsproject. com
ShareX (Best for Power-Users)
- Open Source and free
- Full screen recording with lots of customisation possibilities
- Can also take annotated screenshots
- Fast and lightweight
Loom (Best for Fast Sharing)
- Super easy to use!
- Records and then instantly delivers a shareable link.
- Great for fast video communications to teammates
OBS vs Built in Tools – Which One to Choose?
Use Xbox Game Bar or Snipping Tool if you:
- You just need a short recording
- You’re not looking to install anything
- You’re capturing one app/game
Use OBS or ShareX if:
- You need to capture the whole desktop
- You want advanced controls for audio
- You’re streaming on Twitch/YouTube
Typical Problems and Solutions
Issue: Game Bar not opening with “Windows + G”
Fix: Go to Settings > Gaming > Xbox Game Bar and make sure it’s ON.
Problem: Game Bar is greyed out/disabled
Fix: The game bar can be turned off in certain versions of Windows (particularly Home versions with older hardware). Or use the Snipping Tool approach, or install OBS.
Problem: No sound on recording
Fix: Open Game Bar -> Settings -> make sure both “Record game audio” and “Record microphone” are checked. Ensure the correct microphone is selected in your Windows Sound settings.
Issue: Snipping Tool does not have video camera icon
How to Fix: Your Windows 11 Needs An Update. Install all updates from Settings → Windows Update. Also, update Snipping Tool from the Microsoft Store.
Problem: Video file is huge
Fix: Lower recording quality in Game Bar settings or stop background programs to reduce frame drops.
How to Record Screen on Windows – Summary
Let’s put it all together in the simplest way:
1. Quickest way (Windows 10 & 11):
Press Windows + Alt + R → instantly begin recording the current app
2. Best full screen recording software for Windows 11:
Open Snipping Tool → select Record → outline the region → select Start
3. Best for tutorials that include audio:
Open Xbox Game Bar (Windows + G) -> click record -> voice into your mic
4. Best for complete desktop recording:
Download OBS Studio (free) and use it
FAQs
Q: Is there a built-in screen recorder in Windows 10?
Yes! The Xbox Gamebar on Windows 10. Open it by using Windows + G and then click record. It works on Windows 10 and Windows 11, both.
Q: What is the screen recorder shortcut on Windows?
The fastest shortcut is Windows + Alt + R it starts and stops recording without opening any menus.
Q: Can I record the desktop on Windows?
Xbox Game Bar can’t record the screen. But Snipping Tool Windows 11 and OBS Studio free download can take a picture of the whole screen.
Q: Where are screen recordings saved on Windows?
From now on, Xbox Game Bar will save your videos to the Videos Captures folder. They are saved as MP4 files.
Q: Can I record my screen with audio on Windows?
Yes! In Xbox Game Bar make sure the microphone is turned on before you start recording. You can toggle it with Windows + Alt + M.
Q: Is there a free screen recorder for Windows without a watermark?
Yes, Xbox Game Bar (built in, no watermark), OBS Studio (free download no watermark), and ShareX (free no watermark) are all great options.
Final Thoughts
Learning how to record your screen on Windows is one of the most useful computer skills you can have. Whether you’re a student making a project a gamer saving your best moments or a professional creating tutorials it’s super easy once you know the right tools.
Start with the Windows + Alt + R shortcut for the fastest recording. If you need more control use the Snipping Tool on Windows 11. And if you need professional-level recording, OBS Studio is always free and powerful.
Now go ahead and try recording your screen right now!
Found this guide helpful? Share it with a friend who’s been struggling to record their screen on Windows!